Zxrr Finished
Moderator: Moderators
-
petchickens
- Posts: 109
- Joined: Tue Jul 31, 2012 6:55 pm
- My Bike: 1994 zx4r
- Location: usually the dog house
Re: Zxrr Finished
really nice pal bet it cost a bit but like the detail
"good" is a matter of opinion...its a 90's bike...styling is purely up to you, but its a nice bike, dont make it look like some wannabe-toad-looking-need-for-speed-ricer-pile-of-crap...
-
Joshhiee
- Posts: 2
- Joined: Wed Aug 29, 2012 9:51 pm
- My Bike: Bicycle
Re: Zxrr Finished
What about your hoses? how have you worked around to not have them? aswell as the fairing bracket?
-
Bikebunker
- Posts: 11
- Joined: Tue Nov 13, 2012 10:32 pm
- My Bike: zxr400
Re: Zxrr Finished
what digital dash have you used?
-
Big Hoddie
- Posts: 191
- Joined: Fri Jun 15, 2012 5:33 pm
- My Bike: ZX4R
- Location: Wellesbourne
Re: Zxrr Finished
Where'd you get the custom fairings? Are they rs250 tyga fairings? How'd you fit them? How did you get rid of the mirror brace/front subframe? What clock have you used? How easy was fitting?
Sorry for the questions, but you've created what I've envisioned for months! Haha
Sorry for the questions, but you've created what I've envisioned for months! Haha
-
Leey
- Posts: 138
- Joined: Sun Apr 17, 2011 11:23 am
- My Bike: Zxr400L8
- Location: gloucestershire
Re: Zxrr Finished
[quote="Big Hoddie"]Where'd you get the custom fairings? Are they rs250 tyga fairings? How'd you fit them? How did you get rid of the mirror brace/front subframe? What clock have you used? How easy was fitting?
No problems with all the questions.
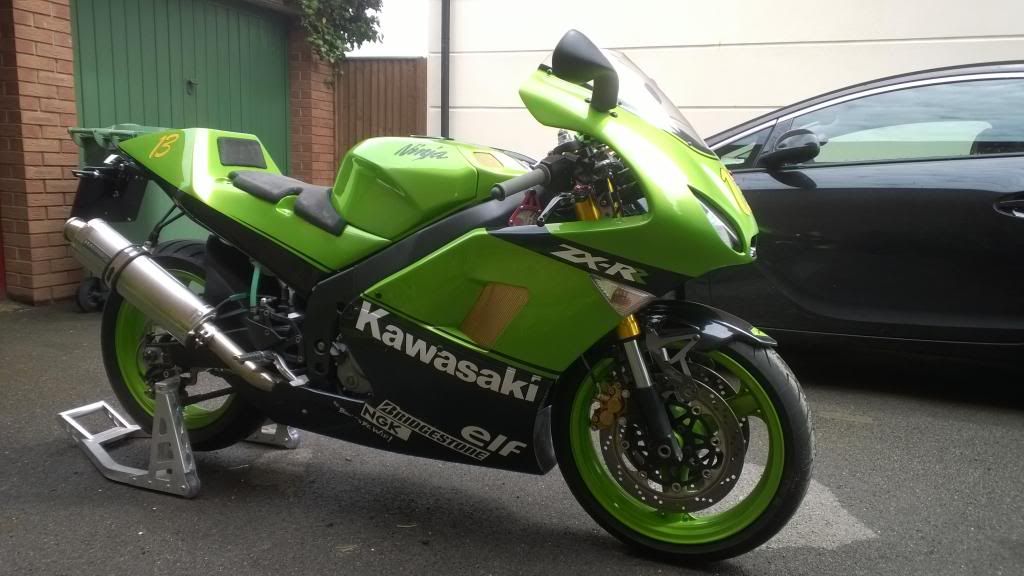
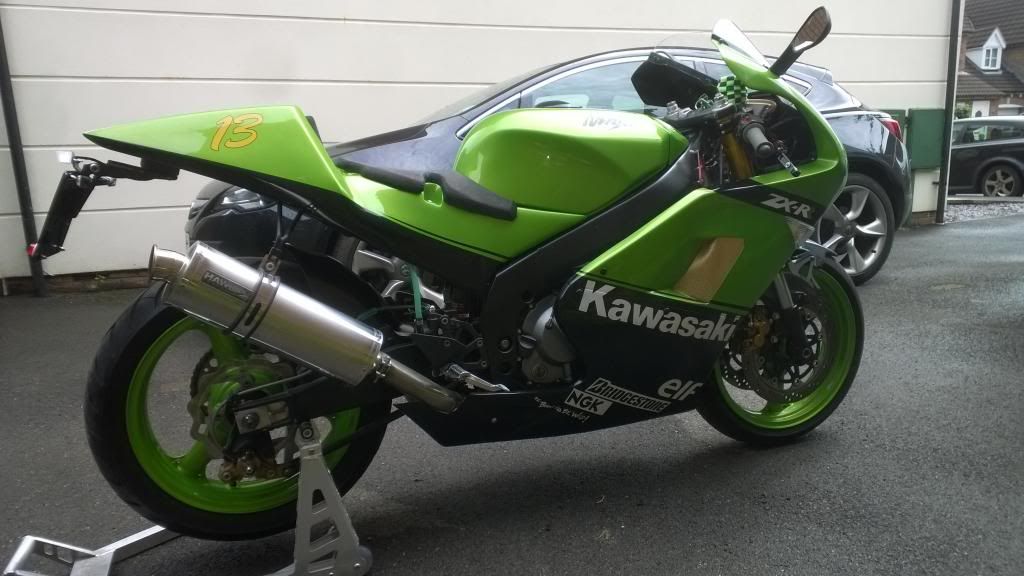
The fairings are Tyga Aprilia rs 250.
Lots of hard work and fabrication to make them fit .
.
The kit comes with its own front and rear sub frames, so you basically dump the zxr 4 front clock sub frame mirror brace and rear sub frames.
First you cut off the rear tank bracket which is bolted to the rear zxr sub frame. Fit the Tyga rear sub frame to the upper zxr chassis sub frame bolts then the 2 lower sub frame spars need to remove and re welded in new position this will determine seat height and angle these need to be bolted to the lower zxr chassis sub frame mount. Then re welded in final position.
Next fit the fuel tank fabricate a new tank bracket, mount on Tyga sub frame and weld to tank (make sure fuel tank is empty).
Next fit the Tyga seat unit this needs to be extending around zxr tank sides and the seat pad area needs to fill in to meet rear of fuel tank.
Front sub frame is a bit easier to mount just need to make an aluminium bracket mate this to the zxr head stock and to Tyga front sub frame this will take most of the Tyga fairing weight.
Fit the front upper fairing I used the existing zxr fairing brackets on the chassis rails just swap the ordination of the two brackets by changing left bracket to right and turning upside down drill 2 holes to mount upper fairing and bolt.
Also mounted the zx6r indicators to the front upper fairing and fabricated the air scoops.
Rear lower fairing needs to widen around rad oil coiler and clearance for downpipes, shaped around rear sets and side stand for clearance issues. New bracket fabricated to move side stand forward 18mm and out 10mm. Use existing lower rear fairing supports to secure fairing. .
.
Plus all this.
Cut and shape rear of down pipes to fit in side of new fairing.
Fabricate exhaust bracket.
Fit new rear master cylinder resevior.
Relocate cdi, fuse box, regulator rectifier solenoids to rear of Tyga sub frame.
Fit small compact battery as existing battery is too large for new sub frame.
Re wire Tyga lights to suit zxr.
Fit new digital dash used a Ace well 3252 with warning lights made new dash bracket to fit on to Tyga sub frame, re wire to zxr electrics to do this neatly took about 30 hours used auxiliary fuse in fuse box to power. All warning light neutral oil temp speed and rpm through new dash.
Paint and respray.
Job done
No problems with all the questions.
The fairings are Tyga Aprilia rs 250.
Lots of hard work and fabrication to make them fit
The kit comes with its own front and rear sub frames, so you basically dump the zxr 4 front clock sub frame mirror brace and rear sub frames.
First you cut off the rear tank bracket which is bolted to the rear zxr sub frame. Fit the Tyga rear sub frame to the upper zxr chassis sub frame bolts then the 2 lower sub frame spars need to remove and re welded in new position this will determine seat height and angle these need to be bolted to the lower zxr chassis sub frame mount. Then re welded in final position.
Next fit the fuel tank fabricate a new tank bracket, mount on Tyga sub frame and weld to tank (make sure fuel tank is empty).
Next fit the Tyga seat unit this needs to be extending around zxr tank sides and the seat pad area needs to fill in to meet rear of fuel tank.
Front sub frame is a bit easier to mount just need to make an aluminium bracket mate this to the zxr head stock and to Tyga front sub frame this will take most of the Tyga fairing weight.
Fit the front upper fairing I used the existing zxr fairing brackets on the chassis rails just swap the ordination of the two brackets by changing left bracket to right and turning upside down drill 2 holes to mount upper fairing and bolt.
Also mounted the zx6r indicators to the front upper fairing and fabricated the air scoops.
Rear lower fairing needs to widen around rad oil coiler and clearance for downpipes, shaped around rear sets and side stand for clearance issues. New bracket fabricated to move side stand forward 18mm and out 10mm. Use existing lower rear fairing supports to secure fairing.
Plus all this.
Cut and shape rear of down pipes to fit in side of new fairing.
Fabricate exhaust bracket.
Fit new rear master cylinder resevior.
Relocate cdi, fuse box, regulator rectifier solenoids to rear of Tyga sub frame.
Fit small compact battery as existing battery is too large for new sub frame.
Re wire Tyga lights to suit zxr.
Fit new digital dash used a Ace well 3252 with warning lights made new dash bracket to fit on to Tyga sub frame, re wire to zxr electrics to do this neatly took about 30 hours used auxiliary fuse in fuse box to power. All warning light neutral oil temp speed and rpm through new dash.
Paint and respray.
Job done
-
copeyhagen
- Posts: 58
- Joined: Mon Mar 26, 2012 10:10 am
- My Bike: zxr 400
Re: Zxrr Finished
lot of work but wel well worth it.
if this was the states somebody would go out and make a bolt on kit for us.
if this was the states somebody would go out and make a bolt on kit for us.
-
GibboN
- Posts: 57
- Joined: Tue Nov 20, 2012 11:57 am
- My Bike: ZXR400 M4 ('94)
- Location: Hong Kong
Re: Zxrr Finished
Very very nice. I prefer more modern looking bikes generally but this has been done very well. Lovely bike!
-
Mavve750

- Posts: 62
- Joined: Fri Jul 18, 2008 3:11 pm
- My Bike: 5 ninjas and one R1.
- Location: Sweden
Re: Zxrr Finished
Very nice looking bike!!
What rear wave disc is that you got there?
What rear wave disc is that you got there?
-
Leey
- Posts: 138
- Joined: Sun Apr 17, 2011 11:23 am
- My Bike: Zxr400L8
- Location: gloucestershire
Re: Zxrr Finished
Cheers the rear disc is a Galfer wavy discMavve750 wrote:Very nice looking bike!!
What rear wave disc is that you got there?
-
Leey
- Posts: 138
- Joined: Sun Apr 17, 2011 11:23 am
- My Bike: Zxr400L8
- Location: gloucestershire
Re: Zxrr Finished
Bought a new tail section for the zxr just need to modify the sub frame when I get some time

-
Mori Man

- Blingmeister

- Posts: 1976
- Joined: Thu May 10, 2007 3:30 pm
- My Bike: ZXR400J2
- Location: JAPAN
Re: Zxrr Finished
Candy Lime Green - hope your no Randy Ding Puniet ! 
Nothing worse than having an H and not being able to scratch it !
Living life on the edge, SuPposedly
Living life on the edge, SuPposedly
-
copeyhagen
- Posts: 58
- Joined: Mon Mar 26, 2012 10:10 am
- My Bike: zxr 400
Re: Zxrr Finished
you gonna cut the tail or leave it the shape it is
-
Leey
- Posts: 138
- Joined: Sun Apr 17, 2011 11:23 am
- My Bike: Zxr400L8
- Location: gloucestershire
Re: Zxrr Finished
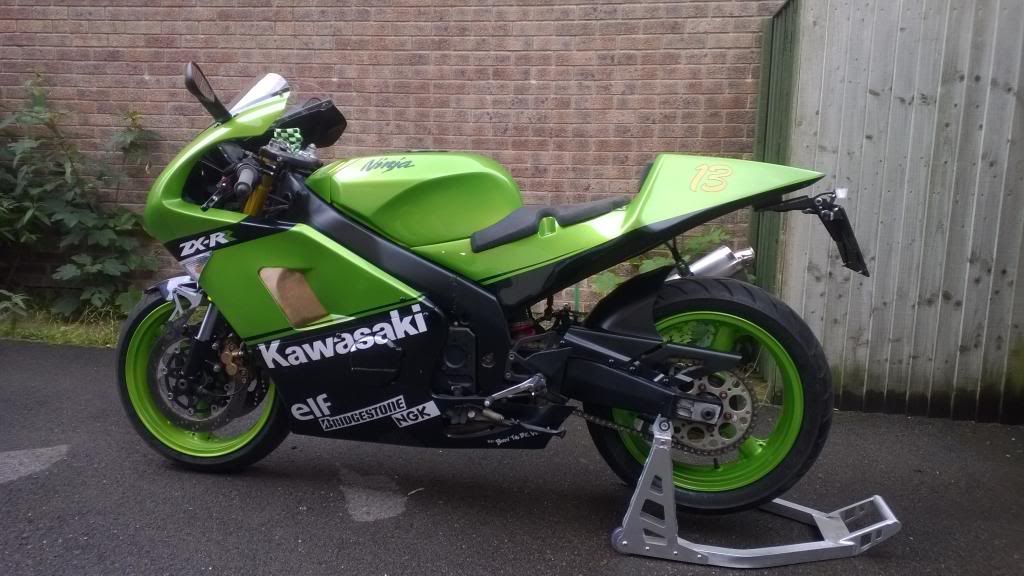
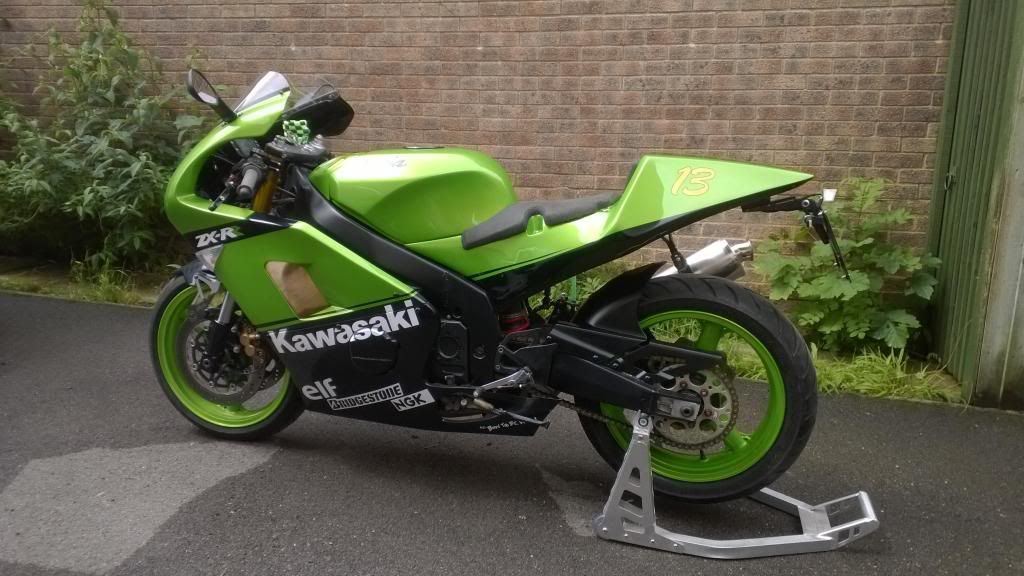
Only going to cut the tail where it meets the chassis to get the best fit. The tail unit is sitting on the old subframe in that pic so it looks strange.
Got a ktm rc8 brake light to fit in the tail.
Got a ktm rc8 brake light to fit in the tail.
-
Leey
- Posts: 138
- Joined: Sun Apr 17, 2011 11:23 am
- My Bike: Zxr400L8
- Location: gloucestershire
Re: Zxrr Finished
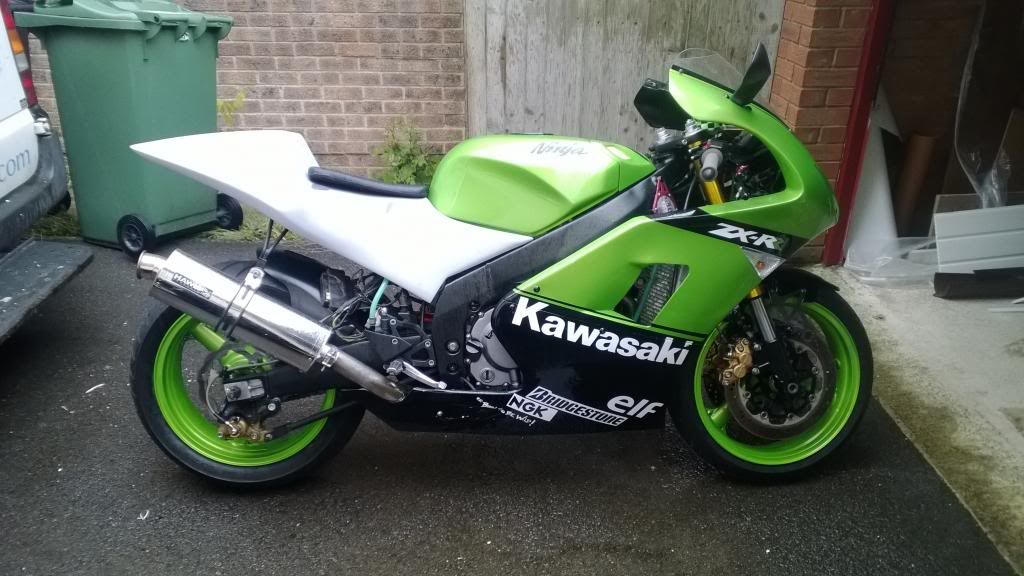
Well got round to finishing off the zxr here a few pics
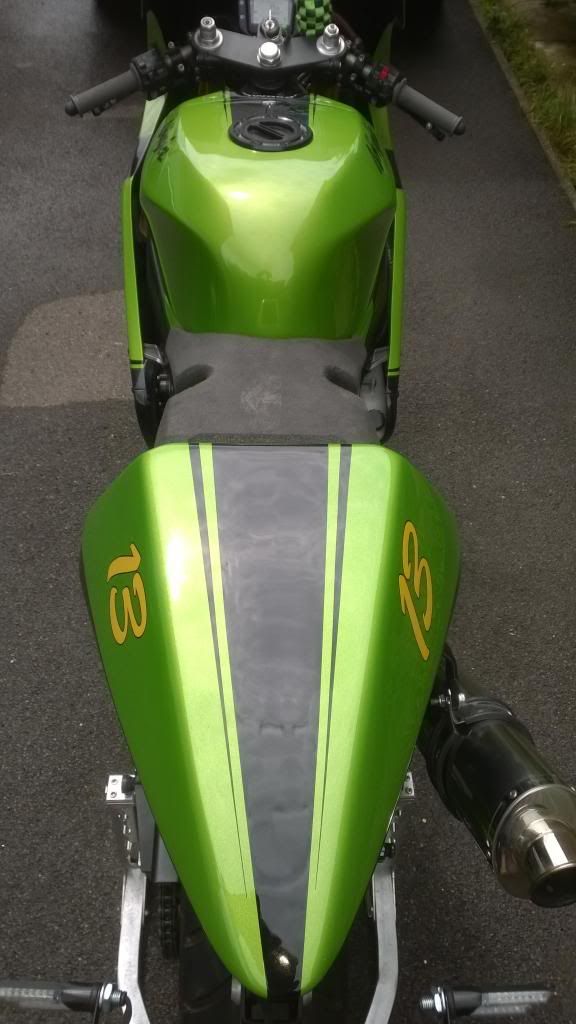
Just got to get some rear sets a shock and some new tyres.


Just got to get some rear sets a shock and some new tyres.
-
kawazonkey
- Posts: 102
- Joined: Mon Oct 07, 2013 11:54 pm
- My Bike: Kawasaki zxr400
Re: Zxrr Finished
That is a thing of beauty...very nice work.